2026 / 07 / 22
RA6M3:如何用FSP配置FreeRTOS+TCP实现以太网通信
一、概述
本文介绍基于e2 studio开发环境,使用EK-RA6M3评估板,通过FSP配置FreeRTOS+TCP,实现以太网通信。
二、工程配置
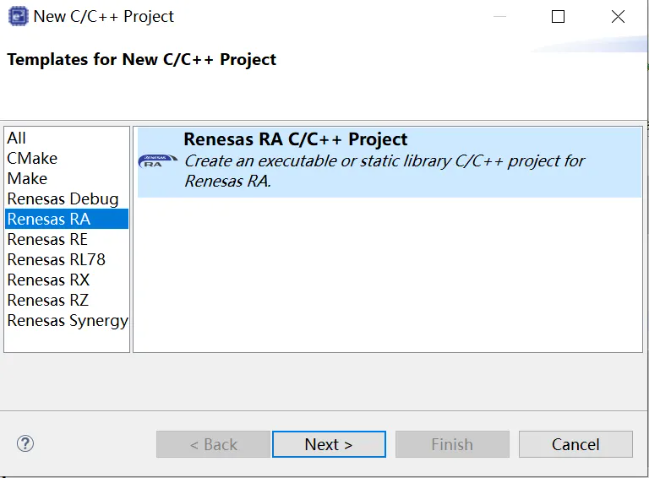
新建一个项目Renesas RA工程。
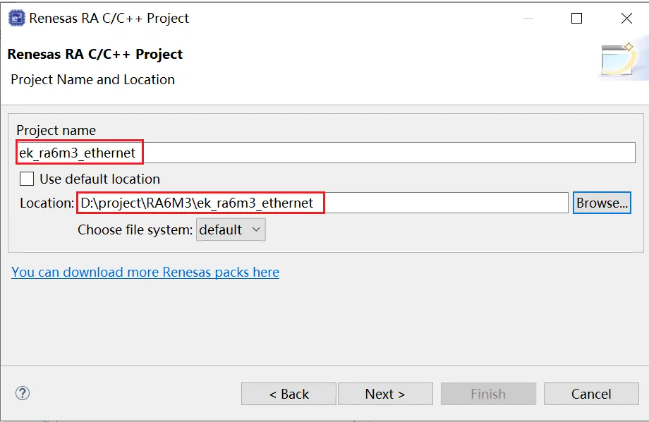
输入项目名称ek_ra6m3_ethernet,选择工程路径。
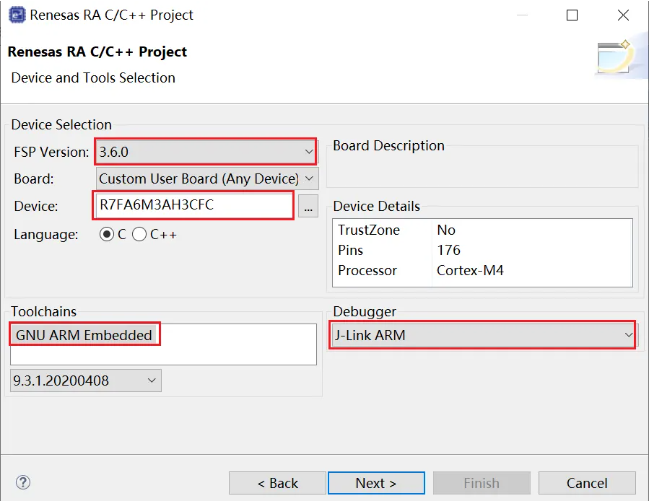
选择目标芯片,EK-RA6M3是R7FA6M3AH3CFC,以及FSP Version,Toolchains,Debugger。
选择工程属性RTOS Selection,选择FreeRTOS。
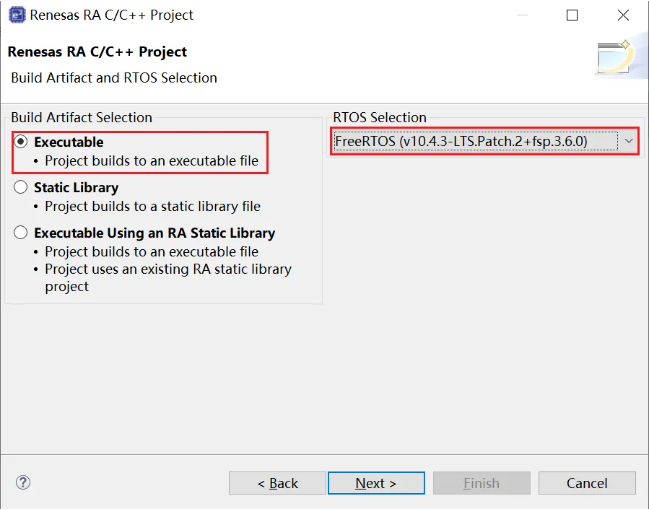
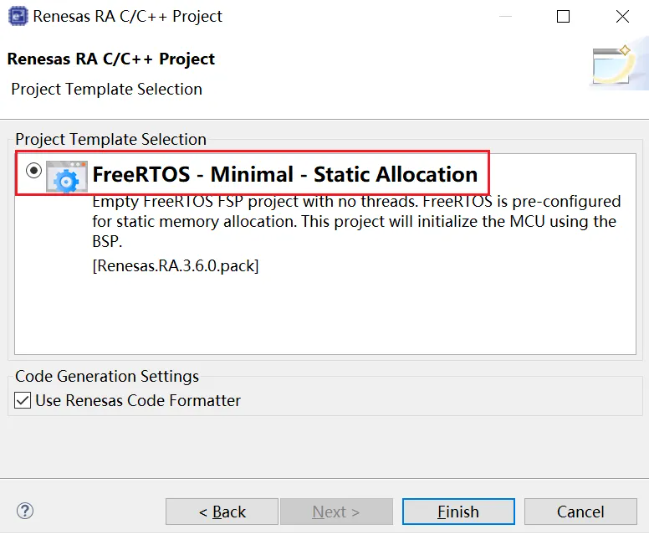
勾选中Freetos - Minimal – Static Allocation,点击完成。
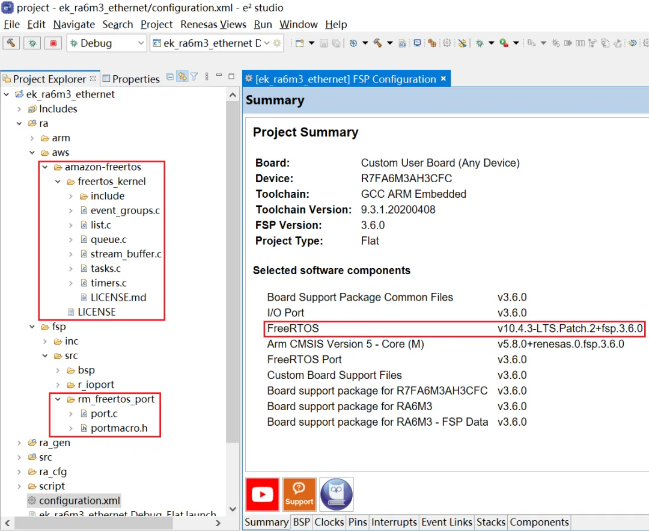
默认会打开新建的工程配置文件configuration.xml已经包含FreeRTOS的内核代码以及RA6M3芯片的移植。Summary可以看到FreeRTOS版本,FSP以及RA6M3的BSP版本等。FreeRTOS
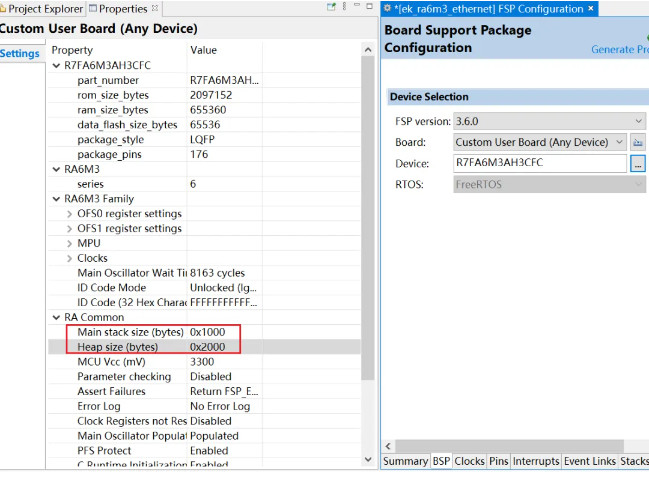
点击FSP标签,设定堆栈。
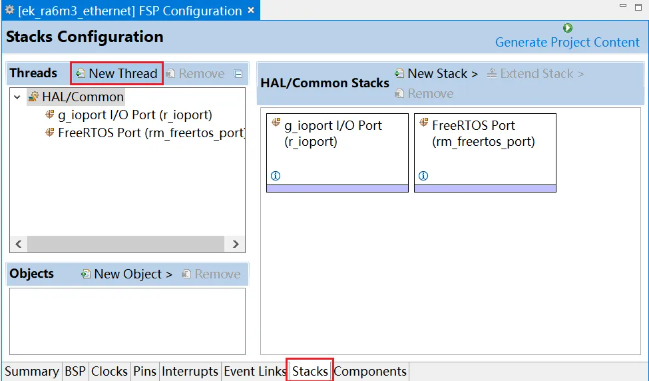
点击Stack标签,切换至Stack窗口,显示目前的配置,Threads可通过点击New Thread。
点击New Thread创建一个新任务,点击New Thread标签,查看任务属性(Properties),Symbol设置为net_thread,Name设置为Net Thread,设定任务的Stack size。
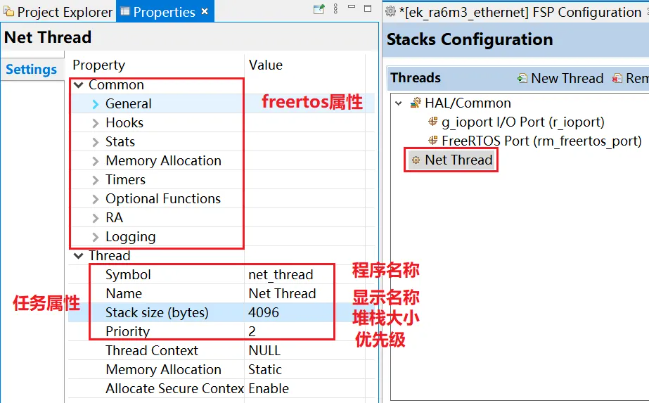
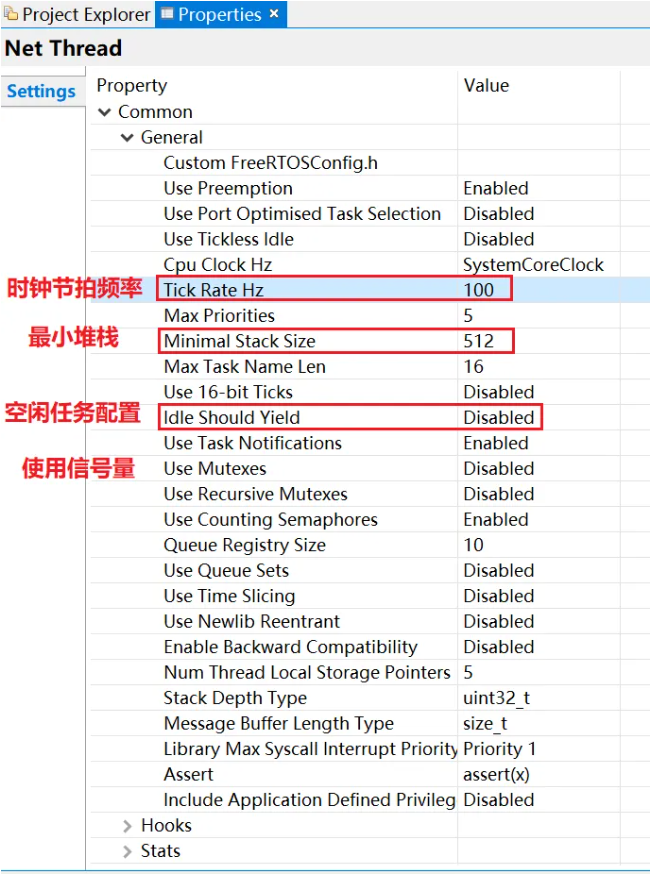
点击common标签,查看FreeRTOS配置,修改FreeRTOS的属性,Tick Rate Hz,Minimal Stack Size,Idle Should Yield等。
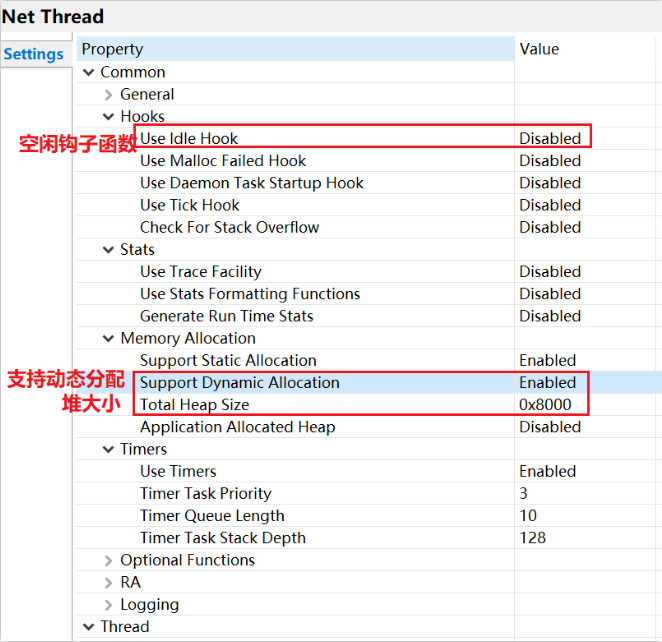
点击Common里的Hooks,Stats,Memory Allocation,Timers,修改配置,Support Dynamic Allocation设为Enable,Total Heap Size改为0x8000。
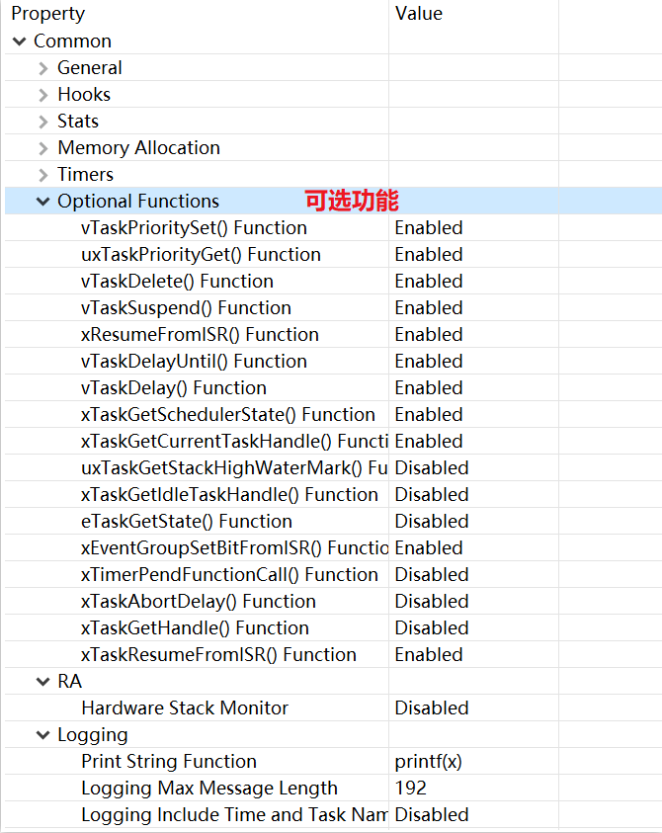
点击Common里的Optional Functions,FreeRTOS的可选功能可以根据要求选择打开。
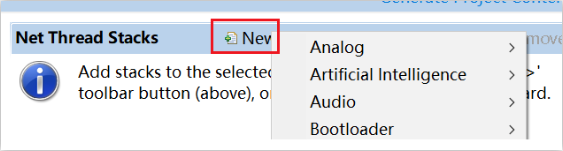
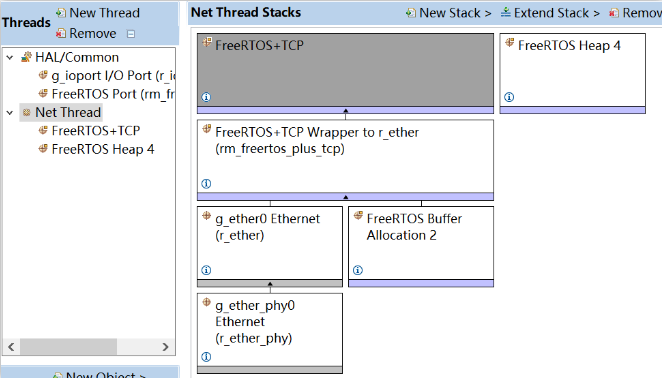
回到Net Thread,点击New Stack,增加一个stack,Networking -> FreeRTOS+TCP,(要按方向键拉到最下面)
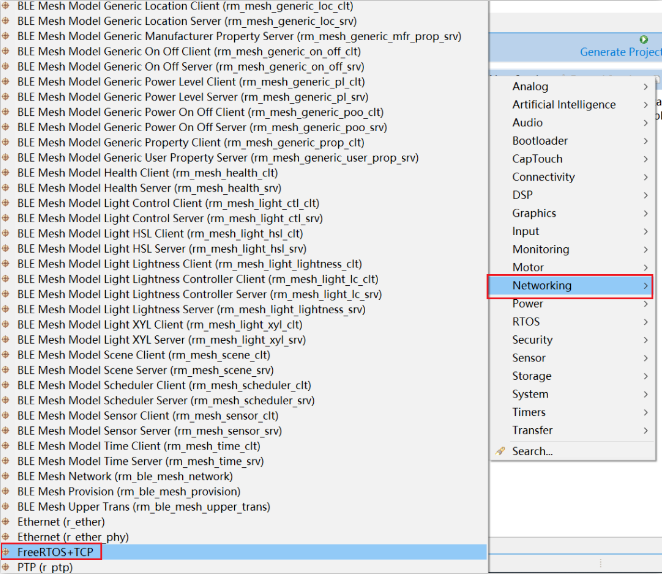
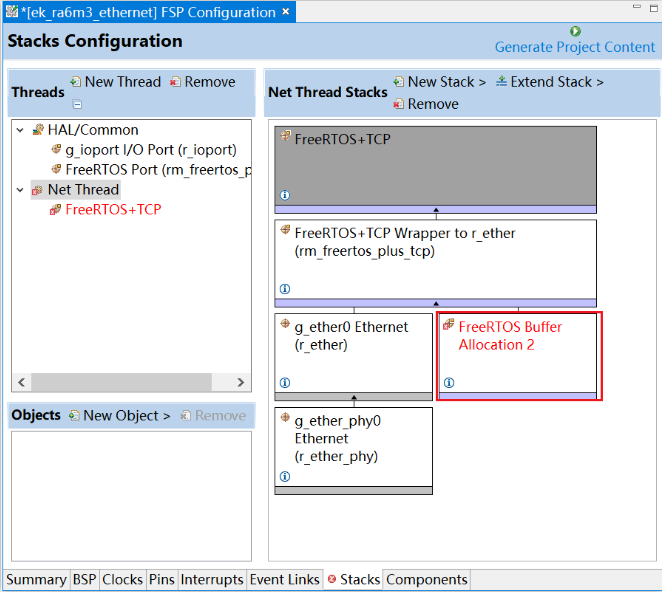
FreeRTOS+TCP已经成功添加。
为Freertos添加内存管理函数,这里选择Heap 4 (heap_4.c)。
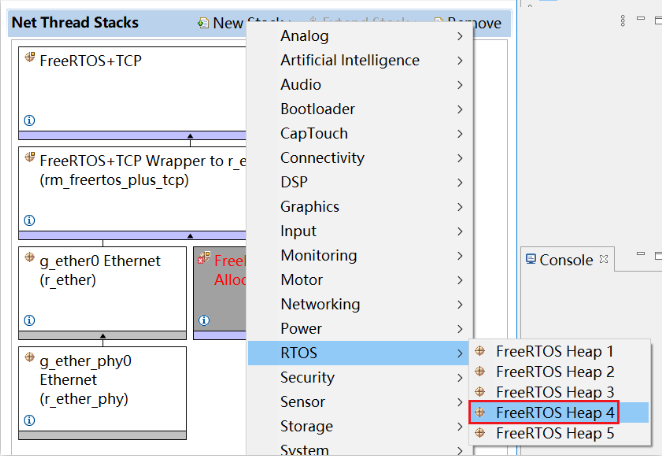
增加了FreeRTOS Heap4的FreeRTOS+TCP。存管理函数,这里选择Heap 4 (heap_4.c)。
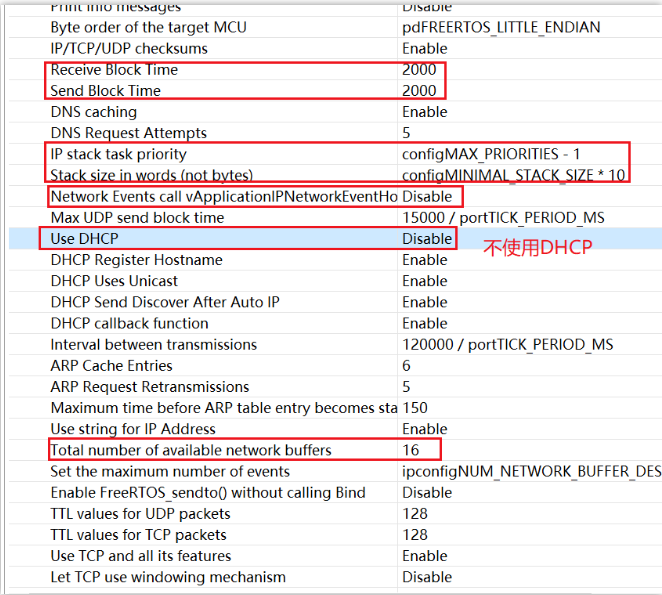
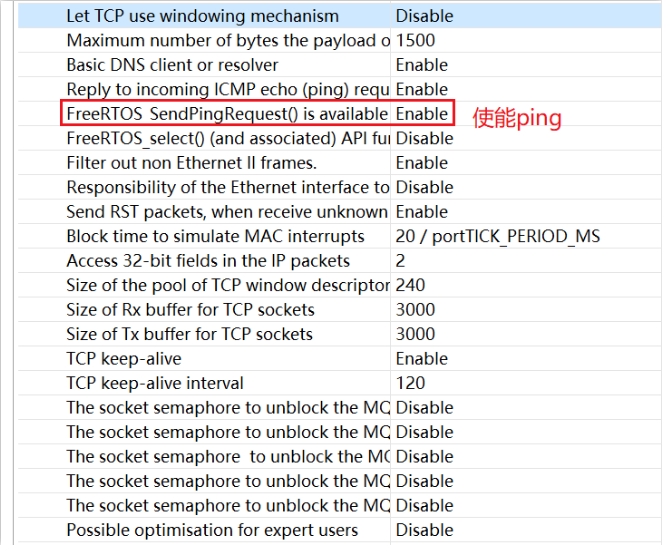
点击FreeRTOS+TCP标签,配置属性。修改发送接收延时,本例子使用静态IP地址,把DHCP设为Disable,另外Network Events call vApplicationIPNetworkEventHook设为Disable,设置IP stack task priority,Stack size in words等。
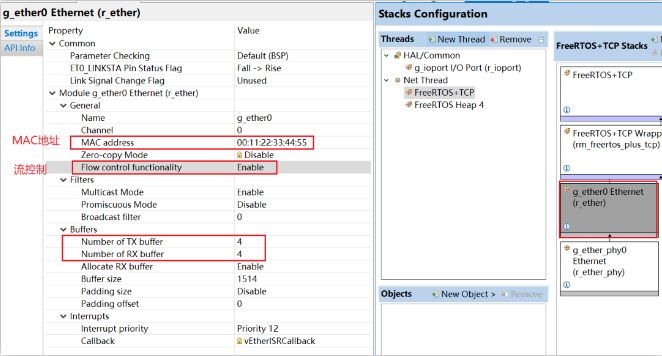
点击g_ether0 Ethernet(r_ether),修改MAC配置属性。
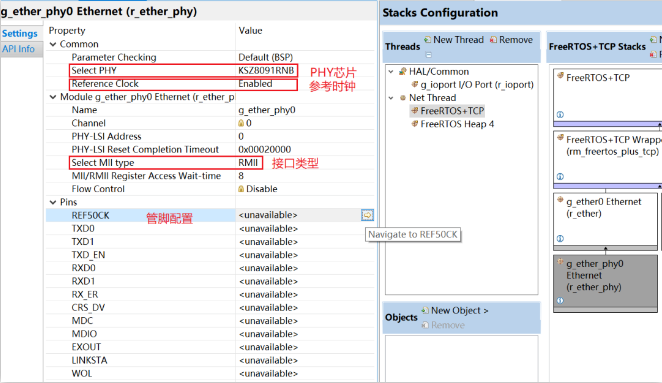
点击g_ether_phy0 Ethernet(r_ether_phy),修改配置PHY属性,Value的小箭头可指定管脚。
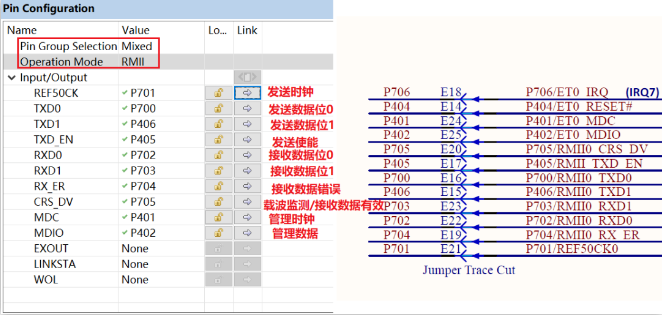
按照开发板设定RMII模式的各个引脚(Pin Group Selection为 Mixed)。
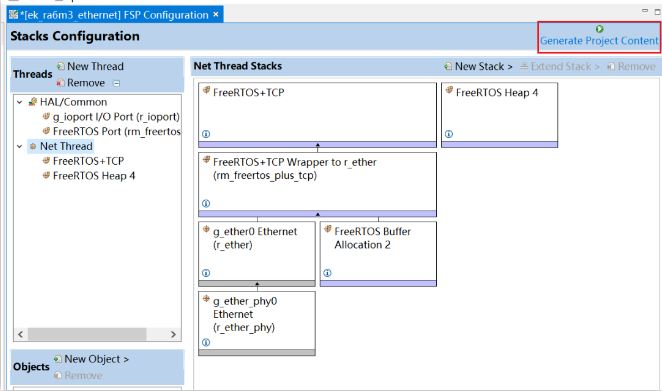
配置完成,点击Generate Project Content 生产代码。
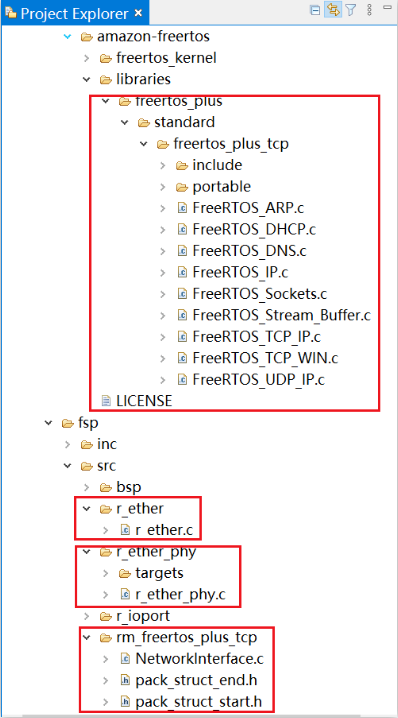
在项目文件列表里面可以看到生成了FreeRTOS+TCP相关的代码。
三、添加应用代码
net_thread_entry.c是FSP生成针对Net Thread的文件,默认只有一个函数net_thread_entry()。我们通过修改这个文件,函数实现以太网的通信功能。
头文件,IP地址等相关宏定义
#include"net_thread.h"
#include "FreeRTOS_IP.h"
#include "FreeRTOS_IP_Private.h"
#include "FreeRTOS_Sockets.h"

/* Target IP address */
#define USR_TEST_PING_IP "192.168.0.100"

/* Ethernet status */
#define ETHERNET_LINK_DOWN 0x01
#define ETHERNET_LINK_UP 0x00
#define IP_LINK_DOWN 0x02
#define IP_LINK_UP 0x00

#define SUCCESS 0

/* MAC address,IPV4 address,subnet mask,gateway,DNS */
static  uint8_t ucMACAddress[ 6 ]       = {0x00, 0x11, 0x22, 0x33, 0x44, 0x55};
static  uint8_t ucIPAddress[ 4 ]        = {192, 168, 0, 52};
static  uint8_t ucNetMask[ 4 ]          = {255, 255, 255, 0};
static  uint8_t ucGatewayAddress[ 4 ]   = {192, 168, 0, 1};
static  uint8_t ucDNSServerAddress[ 4 ] = {192, 168, 0, 1};

char *remote_ip_address = USR_TEST_PING_IP;

uint32_t isNetworkUp(void);
BaseType_t vSendPing( const char *pcIPAddress);
检查以太网是否打开
/*******************************************************************************************************************//**
 * @brief      This Function checks the Network status (Both Ethernet and IP Layer). If the Network is down
 *             the Application will not send any data on the network.
 * @param[in]  None
 * @retval     Network Status
 **********************************************************************************************************************/
uint32_t isNetworkUp(void)
{
    fsp_err_t  eth_link_status = FSP_ERR_NOT_OPEN;
    BaseType_t networkUp = pdFALSE;
    uint32_t network_status = (IP_LINK_UP | ETHERNET_LINK_UP);

    networkUp = FreeRTOS_IsNetworkUp();
    eth_link_status = R_ETHER_LinkProcess(g_ether0.p_ctrl);

if((FSP_SUCCESS == eth_link_status) && (pdTRUE == networkUp))
    {
return network_status;
    }
    else
    {
if(FSP_SUCCESS != eth_link_status)
        {
            network_status |= ETHERNET_LINK_DOWN;
        }
  else if(FSP_SUCCESS == eth_link_status)
        {
            network_status |= ETHERNET_LINK_UP;
        }

  if(pdTRUE != networkUp)
        {
             network_status |= IP_LINK_DOWN;
        }
  else if(pdTRUE == networkUp)
        {
             network_status |= IP_LINK_UP;
        }
  return network_status;
    }
}
定义用户钩子函数,当收到ping答复之后通过TCP/IP栈调用
/*******************************************************************************************************************//**
* @brief      User Hook for the Ping Reply. vApplicationPingReplyHook() is called by the TCP/IP
*             stack when the stack receives a ping reply.
* @param[in]  Ping reply status and Identifier
* @retval     None
**********************************************************************************************************************/
void vApplicationPingReplyHook( ePingReplyStatus_t eStatus, uint16_t usIdentifier )
{
    (void)usIdentifier;

    switch (eStatus)
    {
    /* A valid ping reply has been received */
    case eSuccess:
    break;
    /* A reply was received but it was not valid. */
    case eInvalidData:
    default:
    break;
    }
}
ping命令函数
/*******************************************************************************************************************//**
* @brief      Send ICMP Ping request  based on the user input IP Address.
* @param[in]  IP address to Ping
* @retval     Sequence Number
**********************************************************************************************************************/
BaseType_t vSendPing(const char *pcIPAddress)
{
/*
* The pcIPAddress parameter holds the destination IP address as a string in
* decimal dot notation (for example, “192.168.0.200”). Convert the string into
* the required 32-bit format.
*/
uint32_t ulIPAddress = FreeRTOS_inet_addr(pcIPAddress);

/*
* Send a ping request containing 8 data bytes.  Wait (in the Blocked state) a
* maximum of 100ms for a network buffer into which the generated ping request
* can be written and sent.
*/
return(FreeRTOS_SendPingRequest(ulIPAddress, 8, 100 / portTICK_PERIOD_MS));
}
net_thread_entry () 函数
void net_thread_entry(void *pvParameters)
{

    FSP_PARAMETER_NOT_USED (pvParameters);

  /* TODO: add your own code here */
    BaseType_t status = pdFALSE;
    uint8_t ping_cnt=0;

    /* FreeRTOS IP init  */
status = FreeRTOS_IPInit(ucIPAddress, ucNetMask, ucGatewayAddress, ucDNSServerAddress, ucMACAddress);
if (pdFALSE == status){}

  while (1)
    {
  if(SUCCESS == isNetworkUp())
        {
    while(ping_cnt < 4)
            {
        /* delay */
                vTaskDelay (100);
  /* Send a ICMP Ping request to the requested IP address */
                status =  vSendPing((char *)remote_ip_address);
                 if (pdFALSE == status){}
                ping_cnt++;
            }
        }
        /* delay */
        vTaskDelay (100);
    }
}
编译工程。
四、连机调试
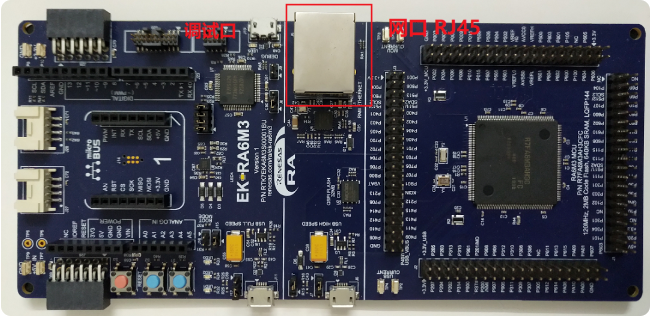
通过RJ45,电脑与EK-RA6M3的板子连接。
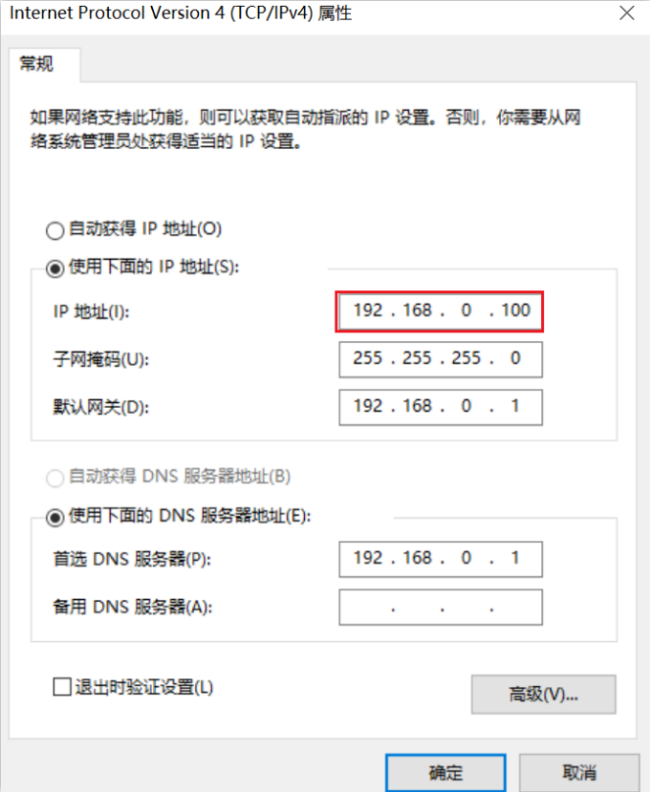
设置电脑的IPv4地址。
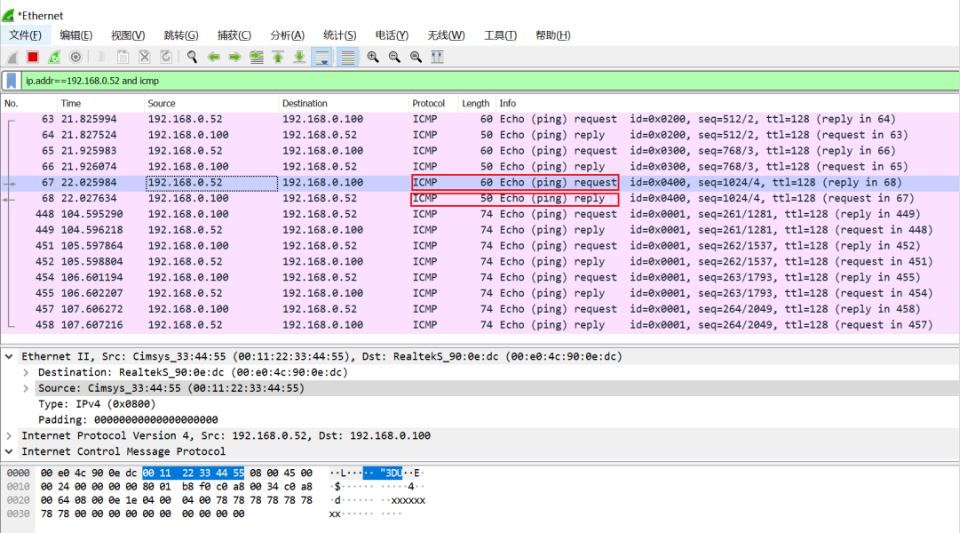
打开Wireshark软件,选择电脑与EK-RA6M3连接的网络Ethernet。

下载ek_ra6m3_ethernet程序到EK-RA6M3开发板,全速运行。
通过Wireshark 软件(过滤数据包ip.addr==192.168.0.52 and icmp)可以看到 EK-RA6M3(IP: 192.168.0.52)发送ping命令到电脑(IP: 192.168.0.100)是正常的,也收到了回复。
通过Windows cmd命令,电脑发送ping命令到开发板是正常的,也收到了回复。
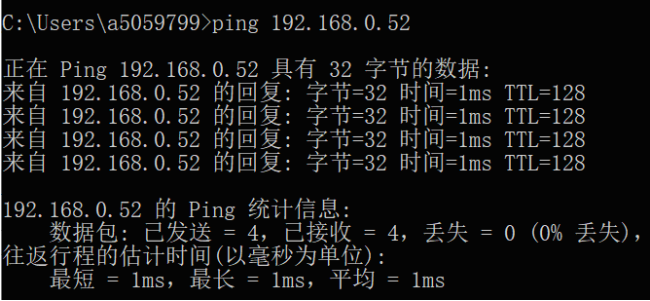
单步测试程序,设置断点在vTaskDelay (100)后面,观察当前运行的任务状态。
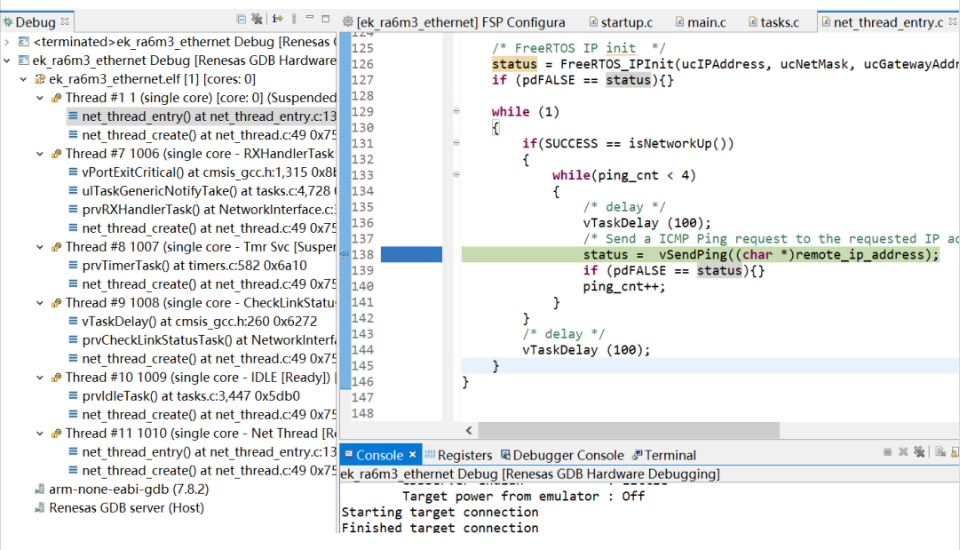
可见只需要正确配置FSP,添加极少量的用户代码,就可以实现网络通信功能。要打印更多信息,参考瑞萨网站的ek-ra6m3开发板的例子。










 样品
样品 应用
应用 微信
微信
